-
Initialization카테고리 없음 2022. 10. 6. 23:56
Initialization 은 사용할 class, structure, enum 의 instance 를 준비하는 과정이다. 이 과정은 instance 의 각 stored property 을 설정하는 것과 다른 필요한 setup (or initialization) 을 시행하는 것을 포함한다.
이러한 initialization 은 initializers 를 정의함으로써 구현할 수 있다. Initializers 는 특정 type 의 새로운 instance 를 만드는 데 사용되는 특별한 methods 와 같다. Objective C 의 initializers 와는 다르게 Swift 의 initializer 는 값을 반환하지 않는다. 여기 initializers 의 주된 역할은 어떤 type 의 새로운 instances 가 처음 사용되기 전에 알맞게 initialized 되도록 보장하는 것이다.
Class Type 의 instances 는 deinitializer 또한 구현할 수 있다. Deinitializer 는 class 의 instance 가 메모리 할당해제가 되기 바로 전에 custom 'cleanup' 과정을 시행한다. 해당 과정은 'Deinitialization' part 에서 더 자세히 다루도록 하겠다.Setting Initial Values for Stored Properties
Classes 와 structures 는 반드시 stored properties 를 적절한 초기값으로 instance 가 생성될 때 정해주어야 한다. Stored properties 는 정해지지 않은 상태로 있을 수 없다.
Initializer 내에서, 또는 property 의 선언 부에서 초기값을 할당시켜줌으로꺼 stored property 를 설정할 수 있다. 아래 sections 에서 아래 과정들을 서술할 것이다.
NOTE
Stored property 에 기본 값을 설정하거나, initializer 에서 설정해 줄 때, 그 값은 다른 property observers 의 호출 없이, 직접적으로 설정되어야 한다.Initializers
Initializer는 특정 type 의 새로운 instance 를 생성하기 위해 호출된다. 가장 간단한 형태의 initializer 는 init keyword 를 , parameters 가 없는 instance method 처럼 아래와 같이 사용한다.
init() {
// perform some initialization here
}
아래 예시에서는 fahrenheit scale 의 온도를 저장하는 Fahrenheit structure 를 정의한다. Fahrenheit structure 는 double type을 갖는 하나의 stored property, 온도 변수를 저장한다.
struct Fahrenheit {
    var temperature: Double
    init() {
        temperature = 32.0
    }
}
var f = Fahrenheit()
print("The default temperature is \(f.temperature)° Fahrenheit")
// Prints "The default temperature is 32.0° Fahrenheit"
이 Structure 는 하나의 initializer, init 을 아무 parameter 없이 정의하고, initializer 는 stored temperature 를 32.0 으로 초기화한다. (물의 화씨 단위 어는점 온도)Default Property Values
Stored property 의 '초기값'을 위에서처럼 initializer 내부에서 설정할 수도 있지만, 해당 property 의 선언 부분에서 '기본 값'으로 정해줄 수도 있다. property 가 정의될 때 초기값을 할당해줌으로써 기본 값을 정해줄 수 있다.
NOTE
만약 property 가 항상 같은 초기값을 가진다면, 기본값을 주는게 initializer 내에서 값을 설정하는 것보다 낫다. 결과는 같지만, 기본값은 property 의 initialization 과 declaration 을 더 가깝게 묶어준다. 이렇게 하면 더 짧고 명확한 initializers 를 만들 수 있고, 또한 기본값으로부터 property 의 type 을 유추할 수 있게 한다. 그리고 기본 initializers 와 initializer 상속을 더 쉽게 이용할 수 있는 장점도 있다.위에 작성한 Fahrenheit structure 를 temperature 를 선언할 때 기본값을 제공함으로써 더 단순하게 아래와 같이 쓸 수 있다.
struct Fahrenheit {
    var temperature = 32.0
}
Customizing Initializationinitialization process 를 input parameters 와 optional property types, 또는 constant properties 를 할당해줌으로써 customize 할 수 있다.
Initialization Parameters값들의 types 과 names 를 정의하기 위해 Initialization parameters 를 initializer 의 정의 부분에 써줌으로서 initialization process 를 customize 할 수 있다.
아래 예시에서는 'Celsius' structure 를 정의한다. 여기서는 온도를 celsius 단위로 표현한다. 또한 이 structure 에서 init(fromHahrenheit:), init(fromKelvin:) 두 custom initializers 를 구현한다. (서로 다른 온도 scale 로부터 새로운 instance 를 정의하기 위함)
struct Celsius {
    var temperatureInCelsius: Double
    init(fromFahrenheit fahrenheit: Double) {
        temperatureInCelsius = (fahrenheit - 32.0) / 1.8
    }
    init(fromKelvin kelvin: Double) {
        temperatureInCelsius = kelvin - 273.15
    }
}
let boilingPointOfWater = Celsius(fromFahrenheit: 212.0)
// boilingPointOfWater.temperatureInCelsius is 100.0
let freezingPointOfWater = Celsius(fromKelvin: 273.15)
// freezingPointOfWater.temperatureInCelsius is 0.0
첫번째 initializer 는 argument label fromFahrenheit, parameter name fahrenheit 를 갖고, 두번째 initializer 는 각각 fromKelvin, kelvin 을 갖는다. 두 initializers 모두 하나의 argument 를 이에 대응하는 Celsius 값으로 바꾸고, 해당 값을 temperatureInCelsius 값에 저장한다.
Parameter Names and Argument Labels
Function 과 method 의 parameters 와 같이, initialization parameters 는 parameter name (initializer 의 body 내에서 쓰임) 과 argument label (initializer 호출할 때 쓰임) 을 가질 수 있다.
그러나, initializers 는 각 함수를 구분하는 이름은 function 과 method 마냥 가질 수 없다. 그러므로, initializer 의 parameters 가 가질 names 와 types 는 어떤 initializer 가 쓰일 지 구분하는 중요한 역할을 맡는다. 그렇기 때문에, 만약 본인이 각 parameter 에 이름을 정해주지 않는다면 Swift 에서 각 parameter 마다 automatic argument label 을 정해준다.
아래 예시에서는 Color structure 를 정의한다. 이 structure 는 세 constant (red, green, blue) properties 를 가진다. 해당 값은 0.0 과 1.0 사이 값 (각 red, green, blue 의 함유량을 나타냄) 을 저장한다. Color 는 또한 white parameter 만을 가지고 있는 두번째 initializer 를 갖는다. (각 color components 에 모두 같은 값을 저장할 때 사용)
struct Color {
    let red, green, blue: Double
    init(red: Double, green: Double, blue: Double) {
        self.red = red
        self.green = green
        self.blue = blue
    }
    init(white: Double) {
        red = white
        green = white
        blue = white
    }
}
두 initializers 는 각 initializer parameter 에 named value 를 제공함으로써 새로운 Color instance 를 만드는 데 사용될 수 있다.
let magenta = Color(red: 1.0, green: 0.0, blue: 1.0)
let halfGray = Color(white: 0.5)
argument labels 없이 두 initializers 를 호출하는 것은 불가능하다. Argument labels 는 만약 정의되었다면 반드시 initializer 에서 사용되어야 하고, 만약 빼먹게 된다면 compile-time error 를 일으키게된다.
let veryGreen = Color(0.0, 1.0, 0.0)
// this reports a compile-time error - argument labels are required
Initializer Parameters Without Argument Labels
만약 initializer parameter 에 argument label 을 사용하고 싶지 않다면, underscore (_) 을 대신 사용해서 default behavior 을 override 할 수 있다.
아래는 기존에 정의했던 Celsius structure 의 확장된 버전이다. 여기에서는 이미 Celsius scale 인 값을 이용해서 새로운 Celsius instance 를 만들기 위한 initializer 가 추가되었다.
struct Celsius {
    var temperatureInCelsius: Double
    init(fromFahrenheit fahrenheit: Double) {
        temperatureInCelsius = (fahrenheit - 32.0) / 1.8
    }
    init(fromKelvin kelvin: Double) {
        temperatureInCelsius = kelvin - 273.15
    }
    init(_ celsius: Double) {
        temperatureInCelsius = celsius
    }
}
let bodyTemperature = Celsius(37.0)
// bodyTemperature.temperatureInCelsius is 37.0
Initializer call Celsius(37.0) 은 argument label 없이도 그 의도를 분명히 알 수 있다. 그렇기 때문에 init(_ celsius: Double) 으로 initializer 를 작성하는게 적절하며, 이름 없이 Double 값을 줌으로써 호출할 수 있다.
Optional Property Types
만약 custom type 의 어떤 property 가 논리적으로 '값을 가질 수 없는' (initialization 에서 값이 정해질 수 없거나, 값을 어떤 순간 이후 가지지 않는게 허용되는) 경우라면, 해당 property 는 optional type 으로 정의해야한다. Optional type 인 Properties 는 자동으로 'nil' 값으로 초기화되고, 이는 해당 property 가 의도적으로 initialization 과정에서 '값을 아직 갖지 않는' 상태임을 의미한다.
아래 예시에서는 SurveyQuestion class 를 정의하고, 이 class 는 response 라는 optional String Type 의 property 를 갖는다.
class SurveyQuestion {
    var text: String
    var response: String?
    init(text: String) {
        self.text = text
    }
    func ask() {
        print(text)
    }
}


let cheeseQuestion = SurveyQuestion(text: "Do you like cheese?")
cheeseQuestion.ask()
// Prints "Do you like cheese?"
cheeseQuestion.response = "Yes, I do like cheese."
Survey Question 에 대한 respons 는 질문하기 전에는 알수가 없으므로, response property 가 String? 으로 정의되었다. 이 값의 기본값은 자동으로 nil 로 할당되며, 이 property는 SurveyQuestion instance 가 initialized 될 때 '아직 문자열을 갖지 않음' 을 의미하는 'nil' 을 자동으로 기본값으로 가지게 된다.
Assigning Constant Properties During Initialization
Initialization 과정에서는 해당 과정이 끝나기 전까지 명확한 값이 설정된다면 언제든지 constant property 에 값을 할당할 수 있다. Constant property 에 값이 할당된 후에는 후에 수정이 불가능하다.
NOTE
Class instances 인 경우, constant property 는 initialization 과정에서 해당 class 내에서만(oly by the class that introduces) 수정 가능하다. subclass 에 의해서는 수정하지 못한다.
For class instances, a constant property can be modified during initialization only by the class that introduces it. It can’t be modified by a subclass.
SurveyQuestion example 에서 question 을 의미하는 text property 를, SurveyQuestion instance 가 생성된 후에 question 은 변하지 않는다는 것을 의미하도록 '변수' 가 아닌 '상수' 로 바꿔볼 수 있다. text property 는 이제 변하지 않는 상태이지만(constant), 여전히 class 의 initializer 에서 설정될 수 있다.
class SurveyQuestion {
    let text: String
    var response: String?
    init(text: String) {
        self.text = text
    }
    func ask() {
        print(text)
    }
}
let beetsQuestion = SurveyQuestion(text: "How about beets?")
beetsQuestion.ask()
// Prints "How about beets?"
beetsQuestion.response = "I also like beets. (But not with cheese.)"
Default Initializers
Swift provides a default initializer for any structure or class that provides default values for all of its properties and doesn’t provide at least one initializer itself. The default initializer simply creates a new instance with all of its properties set to their default values.
This example defines a class called ShoppingListItem, which encapsulates the name, quantity, and purchase state of an item in a shopping list:
- class ShoppingListItem {
- var name: String?
- var quantity = 1
- var purchased = false
- }
- var item = ShoppingListItem()
Because all properties of the ShoppingListItem class have default values, and because it’s a base class with no superclass, ShoppingListItem automatically gains a default initializer implementation that creates a new instance with all of its properties set to their default values. (The name property is an optional String property, and so it automatically receives a default value of nil, even though this value isn’t written in the code.) The example above uses the default initializer for the ShoppingListItem class to create a new instance of the class with initializer syntax, written as ShoppingListItem(), and assigns this new instance to a variable called item.
Memberwise Initializers for Structure Types
Structure types automatically receive a memberwise initializer if they don’t define any of their own custom initializers. Unlike a default initializer, the structure receives a memberwise initializer even if it has stored properties that don’t have default values.
The memberwise initializer is a shorthand way to initialize the member properties of new structure instances. Initial values for the properties of the new instance can be passed to the memberwise initializer by name.
The example below defines a structure called Size with two properties called width and height. Both properties are inferred to be of type Double by assigning a default value of 0.0.
The Size structure automatically receives an init(width:height:) memberwise initializer, which you can use to initialize a new Size instance:
- struct Size {
- var width = 0.0, height = 0.0
- }
- let twoByTwo = Size(width: 2.0, height: 2.0)
When you call a memberwise initializer, you can omit values for any properties that have default values. In the example above, the Size structure has a default value for both its height and width properties. You can omit either property or both properties, and the initializer uses the default value for anything you omit. For example:
- let zeroByTwo = Size(height: 2.0)
- print(zeroByTwo.width, zeroByTwo.height)
- // Prints "0.0 2.0"
- let zeroByZero = Size()
- print(zeroByZero.width, zeroByZero.height)
- // Prints "0.0 0.0"
Initializer Delegation for Value Types
Initializers can call other initializers to perform part of an instance’s initialization. This process, known as initializer delegation, avoids duplicating code across multiple initializers.
The rules for how initializer delegation works, and for what forms of delegation are allowed, are different for value types and class types. Value types (structures and enumerations) don’t support inheritance, and so their initializer delegation process is relatively simple, because they can only delegate to another initializer that they provide themselves. Classes, however, can inherit from other classes, as described in Inheritance. This means that classes have additional responsibilities for ensuring that all stored properties they inherit are assigned a suitable value during initialization. These responsibilities are described in Class Inheritance and Initialization below.
For value types, you use self.init to refer to other initializers from the same value type when writing your own custom initializers. You can call self.init only from within an initializer.
Note that if you define a custom initializer for a value type, you will no longer have access to the default initializer (or the memberwise initializer, if it’s a structure) for that type. This constraint prevents a situation in which additional essential setup provided in a more complex initializer is accidentally circumvented by someone using one of the automatic initializers.
NOTE
If you want your custom value type to be initializable with the default initializer and memberwise initializer, and also with your own custom initializers, write your custom initializers in an extension rather than as part of the value type’s original implementation. For more information, see Extensions.
The following example defines a custom Rect structure to represent a geometric rectangle. The example requires two supporting structures called Size and Point, both of which provide default values of 0.0 for all of their properties:
- struct Size {
- var width = 0.0, height = 0.0
- }
- struct Point {
- var x = 0.0, y = 0.0
- }
You can initialize the Rect structure below in one of three ways—by using its default zero-initialized origin and size property values, by providing a specific origin point and size, or by providing a specific center point and size. These initialization options are represented by three custom initializers that are part of the Rect structure’s definition:
- struct Rect {
- var origin = Point()
- var size = Size()
- init() {}
- init(origin: Point, size: Size) {
- self.origin = origin
- self.size = size
- }
- init(center: Point, size: Size) {
- let originX = center.x - (size.width / 2)
- let originY = center.y - (size.height / 2)
- self.init(origin: Point(x: originX, y: originY), size: size)
- }
- }
The first Rect initializer, init(), is functionally the same as the default initializer that the structure would have received if it didn’t have its own custom initializers. This initializer has an empty body, represented by an empty pair of curly braces {}. Calling this initializer returns a Rect instance whose origin and size properties are both initialized with the default values of Point(x: 0.0, y: 0.0) and Size(width: 0.0, height: 0.0) from their property definitions:
- let basicRect = Rect()
- // basicRect's origin is (0.0, 0.0) and its size is (0.0, 0.0)
The second Rect initializer, init(origin:size:), is functionally the same as the memberwise initializer that the structure would have received if it didn’t have its own custom initializers. This initializer simply assigns the origin and size argument values to the appropriate stored properties:
- let originRect = Rect(origin: Point(x: 2.0, y: 2.0),
- size: Size(width: 5.0, height: 5.0))
- // originRect's origin is (2.0, 2.0) and its size is (5.0, 5.0)
The third Rect initializer, init(center:size:), is slightly more complex. It starts by calculating an appropriate origin point based on a center point and a size value. It then calls (or delegates) to the init(origin:size:) initializer, which stores the new origin and size values in the appropriate properties:
- let centerRect = Rect(center: Point(x: 4.0, y: 4.0),
- size: Size(width: 3.0, height: 3.0))
- // centerRect's origin is (2.5, 2.5) and its size is (3.0, 3.0)
The init(center:size:) initializer could have assigned the new values of origin and size to the appropriate properties itself. However, it’s more convenient (and clearer in intent) for the init(center:size:) initializer to take advantage of an existing initializer that already provides exactly that functionality.
NOTE
For an alternative way to write this example without defining the init() and init(origin:size:) initializers yourself, see Extensions.
Class Inheritance and Initialization
All of a class’s stored properties—including any properties the class inherits from its superclass—must be assigned an initial value during initialization.
Swift defines two kinds of initializers for class types to help ensure all stored properties receive an initial value. These are known as designated initializers and convenience initializers.
Designated Initializers and Convenience Initializers
Designated initializers are the primary initializers for a class. A designated initializer fully initializes all properties introduced by that class and calls an appropriate superclass initializer to continue the initialization process up the superclass chain.
Classes tend to have very few designated initializers, and it’s quite common for a class to have only one. Designated initializers are “funnel” points through which initialization takes place, and through which the initialization process continues up the superclass chain.
Every class must have at least one designated initializer. In some cases, this requirement is satisfied by inheriting one or more designated initializers from a superclass, as described in Automatic Initializer Inheritance below.
Convenience initializers are secondary, supporting initializers for a class. You can define a convenience initializer to call a designated initializer from the same class as the convenience initializer with some of the designated initializer’s parameters set to default values. You can also define a convenience initializer to create an instance of that class for a specific use case or input value type.
You don’t have to provide convenience initializers if your class doesn’t require them. Create convenience initializers whenever a shortcut to a common initialization pattern will save time or make initialization of the class clearer in intent.
Syntax for Designated and Convenience Initializers
Designated initializers for classes are written in the same way as simple initializers for value types:
- init(parameters) {
- statements
- }
Convenience initializers are written in the same style, but with the convenience modifier placed before the init keyword, separated by a space:
- convenience init(parameters) {
- statements
- }
Initializer Delegation for Class Types
To simplify the relationships between designated and convenience initializers, Swift applies the following three rules for delegation calls between initializers:
Rule 1A designated initializer must call a designated initializer from its immediate superclass.
Rule 2A convenience initializer must call another initializer from the same class.
Rule 3A convenience initializer must ultimately call a designated initializer.
A simple way to remember this is:
- Designated initializers must always delegate up.
- Convenience initializers must always delegate across.
These rules are illustrated in the figure below:
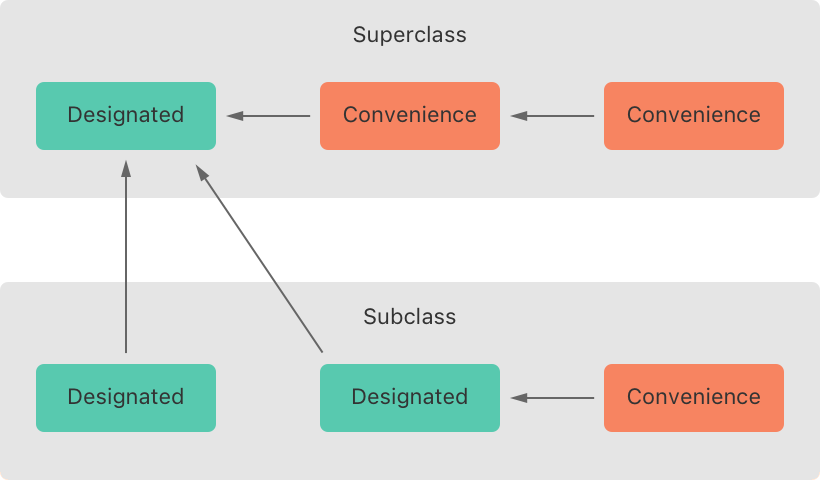
Here, the superclass has a single designated initializer and two convenience initializers. One convenience initializer calls another convenience initializer, which in turn calls the single designated initializer. This satisfies rules 2 and 3 from above. The superclass doesn’t itself have a further superclass, and so rule 1 doesn’t apply.
The subclass in this figure has two designated initializers and one convenience initializer. The convenience initializer must call one of the two designated initializers, because it can only call another initializer from the same class. This satisfies rules 2 and 3 from above. Both designated initializers must call the single designated initializer from the superclass, to satisfy rule 1 from above.
NOTE
These rules don’t affect how users of your classes create instances of each class. Any initializer in the diagram above can be used to create a fully initialized instance of the class they belong to. The rules only affect how you write the implementation of the class’s initializers.
The figure below shows a more complex class hierarchy for four classes. It illustrates how the designated initializers in this hierarchy act as “funnel” points for class initialization, simplifying the interrelationships among classes in the chain:

Two-Phase Initialization
Class initialization in Swift is a two-phase process. In the first phase, each stored property is assigned an initial value by the class that introduced it. Once the initial state for every stored property has been determined, the second phase begins, and each class is given the opportunity to customize its stored properties further before the new instance is considered ready for use.
The use of a two-phase initialization process makes initialization safe, while still giving complete flexibility to each class in a class hierarchy. Two-phase initialization prevents property values from being accessed before they’re initialized, and prevents property values from being set to a different value by another initializer unexpectedly.
NOTE
Swift’s two-phase initialization process is similar to initialization in Objective-C. The main difference is that during phase 1, Objective-C assigns zero or null values (such as 0 or nil) to every property. Swift’s initialization flow is more flexible in that it lets you set custom initial values, and can cope with types for which 0 or nil isn’t a valid default value.
Swift’s compiler performs four helpful safety-checks to make sure that two-phase initialization is completed without error:
Safety check 1A designated initializer must ensure that all of the properties introduced by its class are initialized before it delegates up to a superclass initializer.
As mentioned above, the memory for an object is only considered fully initialized once the initial state of all of its stored properties is known. In order for this rule to be satisfied, a designated initializer must make sure that all of its own properties are initialized before it hands off up the chain.
Safety check 2A designated initializer must delegate up to a superclass initializer before assigning a value to an inherited property. If it doesn’t, the new value the designated initializer assigns will be overwritten by the superclass as part of its own initialization.
Safety check 3A convenience initializer must delegate to another initializer before assigning a value to any property (including properties defined by the same class). If it doesn’t, the new value the convenience initializer assigns will be overwritten by its own class’s designated initializer.
Safety check 4An initializer can’t call any instance methods, read the values of any instance properties, or refer to self as a value until after the first phase of initialization is complete.
The class instance isn’t fully valid until the first phase ends. Properties can only be accessed, and methods can only be called, once the class instance is known to be valid at the end of the first phase.
Here’s how two-phase initialization plays out, based on the four safety checks above:
Phase 1
- A designated or convenience initializer is called on a class.
- Memory for a new instance of that class is allocated. The memory isn’t yet initialized.
- A designated initializer for that class confirms that all stored properties introduced by that class have a value. The memory for these stored properties is now initialized.
- The designated initializer hands off to a superclass initializer to perform the same task for its own stored properties.
- This continues up the class inheritance chain until the top of the chain is reached.
- Once the top of the chain is reached, and the final class in the chain has ensured that all of its stored properties have a value, the instance’s memory is considered to be fully initialized, and phase 1 is complete.
Phase 2
- Working back down from the top of the chain, each designated initializer in the chain has the option to customize the instance further. Initializers are now able to access self and can modify its properties, call its instance methods, and so on.
- Finally, any convenience initializers in the chain have the option to customize the instance and to work with self.
Here’s how phase 1 looks for an initialization call for a hypothetical subclass and superclass:

In this example, initialization begins with a call to a convenience initializer on the subclass. This convenience initializer can’t yet modify any properties. It delegates across to a designated initializer from the same class.
The designated initializer makes sure that all of the subclass’s properties have a value, as per safety check 1. It then calls a designated initializer on its superclass to continue the initialization up the chain.
The superclass’s designated initializer makes sure that all of the superclass properties have a value. There are no further superclasses to initialize, and so no further delegation is needed.
As soon as all properties of the superclass have an initial value, its memory is considered fully initialized, and phase 1 is complete.
Here’s how phase 2 looks for the same initialization call:

The superclass’s designated initializer now has an opportunity to customize the instance further (although it doesn’t have to).
Once the superclass’s designated initializer is finished, the subclass’s designated initializer can perform additional customization (although again, it doesn’t have to).
Finally, once the subclass’s designated initializer is finished, the convenience initializer that was originally called can perform additional customization.
Initializer Inheritance and Overriding
Unlike subclasses in Objective-C, Swift subclasses don’t inherit their superclass initializers by default. Swift’s approach prevents a situation in which a simple initializer from a superclass is inherited by a more specialized subclass and is used to create a new instance of the subclass that isn’t fully or correctly initialized.
NOTE
Superclass initializers are inherited in certain circumstances, but only when it’s safe and appropriate to do so. For more information, see Automatic Initializer Inheritance below.
If you want a custom subclass to present one or more of the same initializers as its superclass, you can provide a custom implementation of those initializers within the subclass.
When you write a subclass initializer that matches a superclass designated initializer, you are effectively providing an override of that designated initializer. Therefore, you must write the override modifier before the subclass’s initializer definition. This is true even if you are overriding an automatically provided default initializer, as described in Default Initializers.
As with an overridden property, method or subscript, the presence of the override modifier prompts Swift to check that the superclass has a matching designated initializer to be overridden, and validates that the parameters for your overriding initializer have been specified as intended.
NOTE
You always write the override modifier when overriding a superclass designated initializer, even if your subclass’s implementation of the initializer is a convenience initializer.
Conversely, if you write a subclass initializer that matches a superclass convenience initializer, that superclass convenience initializer can never be called directly by your subclass, as per the rules described above in Initializer Delegation for Class Types. Therefore, your subclass is not (strictly speaking) providing an override of the superclass initializer. As a result, you don’t write the override modifier when providing a matching implementation of a superclass convenience initializer.
The example below defines a base class called Vehicle. This base class declares a stored property called numberOfWheels, with a default Int value of 0. The numberOfWheels property is used by a computed property called description to create a String description of the vehicle’s characteristics:
- class Vehicle {
- var numberOfWheels = 0
- var description: String {
- return "\(numberOfWheels) wheel(s)"
- }
- }
The Vehicle class provides a default value for its only stored property, and doesn’t provide any custom initializers itself. As a result, it automatically receives a default initializer, as described in Default Initializers. The default initializer (when available) is always a designated initializer for a class, and can be used to create a new Vehicle instance with a numberOfWheels of 0:
- let vehicle = Vehicle()
- print("Vehicle: \(vehicle.description)")
- // Vehicle: 0 wheel(s)
The next example defines a subclass of Vehicle called Bicycle:
- class Bicycle: Vehicle {
- override init() {
- super.init()
- numberOfWheels = 2
- }
- }
The Bicycle subclass defines a custom designated initializer, init(). This designated initializer matches a designated initializer from the superclass of Bicycle, and so the Bicycle version of this initializer is marked with the override modifier.
The init() initializer for Bicycle starts by calling super.init(), which calls the default initializer for the Bicycle class’s superclass, Vehicle. This ensures that the numberOfWheels inherited property is initialized by Vehicle before Bicycle has the opportunity to modify the property. After calling super.init(), the original value of numberOfWheels is replaced with a new value of 2.
If you create an instance of Bicycle, you can call its inherited description computed property to see how its numberOfWheels property has been updated:
- let bicycle = Bicycle()
- print("Bicycle: \(bicycle.description)")
- // Bicycle: 2 wheel(s)
If a subclass initializer performs no customization in phase 2 of the initialization process, and the superclass has a synchronous, zero-argument designated initializer, you can omit a call to super.init() after assigning values to all of the subclass’s stored properties. If the superclass’s initializer is asynchronous, you need to write await super.init() explicitly.
This example defines another subclass of Vehicle, called Hoverboard. In its initializer, the Hoverboard class sets only its color property. Instead of making an explicit call to super.init(), this initializer relies on an implicit call to its superclass’s initializer to complete the process.
- class Hoverboard: Vehicle {
- var color: String
- init(color: String) {
- self.color = color
- // super.init() implicitly called here
- }
- override var description: String {
- return "\(super.description) in a beautiful \(color)"
- }
- }
An instance of Hoverboard uses the default number of wheels supplied by the Vehicle initializer.
- let hoverboard = Hoverboard(color: "silver")
- print("Hoverboard: \(hoverboard.description)")
- // Hoverboard: 0 wheel(s) in a beautiful silver
NOTE
Subclasses can modify inherited variable properties during initialization, but can’t modify inherited constant properties.